Creating a poll with LiquidPoll is as easy as a walk in the park.
Create a Poll #
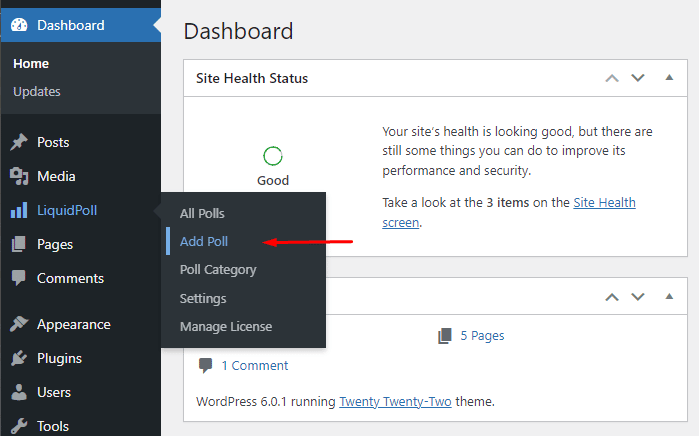
Go from your WordPress Dashboard to LiquidPoll > Add Poll
Setting up your poll #
Now you will see the poll’s editor come in front of you. This editor is divided into 3 tabs. We will go one by one.
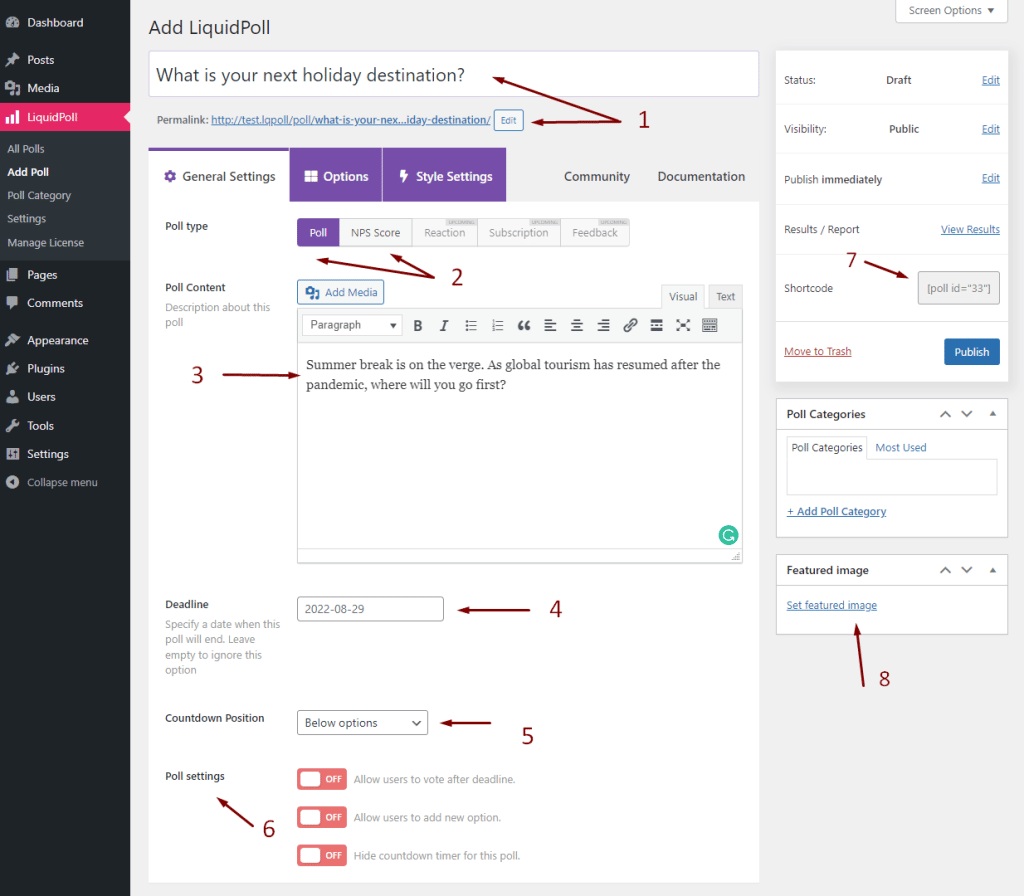
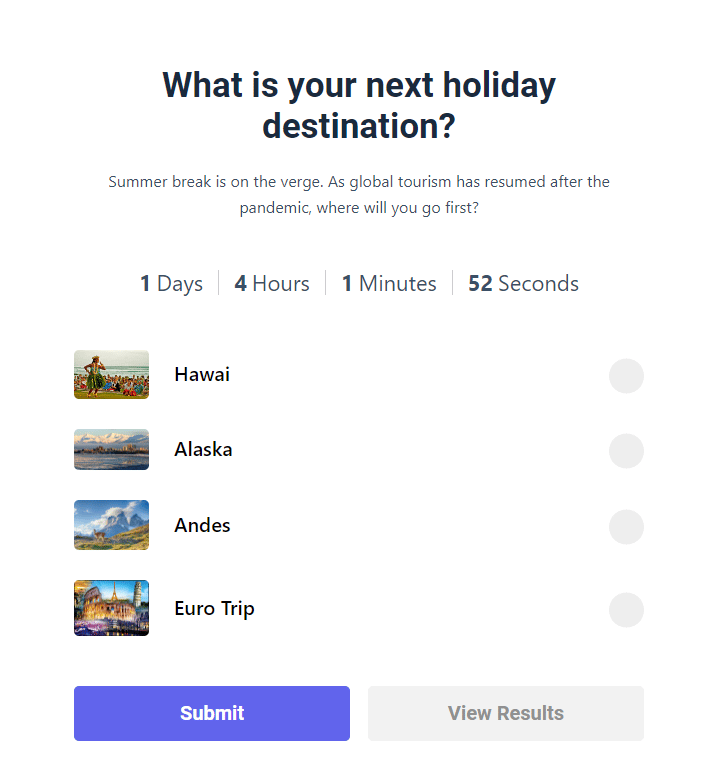
- Poll Title: In this field, write the title of your poll. This will appear at the very top of the poll. The poll title will also become the permalink of the poll, so if you want a different permalink, simply edit the link below to something more simple.
- Poll Type: LiquidPoll currently supports two types of polls, Poll and NPS. There are more in development. Polls create single or multiple choice questions, whereas NPS creates options in a range of your preference in a parallel line hierarchy.
- Poll Description: Appears directly under the title if there is no featured image. You could add some text here to ignite the curiosity of the user to participate in the poll. You cannot add any image or media here. But emojis are supported.
- Deadline: If you want your poll to expire after a certain date. Use this field. The time is matched with your host server’s time and will be dynamically updated with the user’s local time zone.
- Countdown: each poll can be timed. With this drop-down menu, you can determine whether it will appear under the options or above (Pro only). We still do not have the customization for how much time it will take to count down. We will include this enhancement in an upcoming release.
- Settings: There are multiple features here. The most important of them is giving the users the option to add their own options to the poll. There is no limit on how many new options can be added. But having too many options can affect the user experience of the page. So, use this carefully. The other options are self-explanatory.
- Shortcode: Copy and paste this code into any other page, works on both visual editor and HTML. Clicking the text here automatically copies it into your clipboard. Make sure to publish the poll before you do.
- Featured Image: This is the image that directly appears under the title. A beautiful and relevant image catches the eye of the user more effectively.
Adding Poll Options #
Heading over to the Options tab you will be able to add as many options as you want. Using an even number of options is recommended for a symmetrical display when using a theme that displays the poll options in two columns. But if it is a single column, then odd numbers do not cause a UI issue.
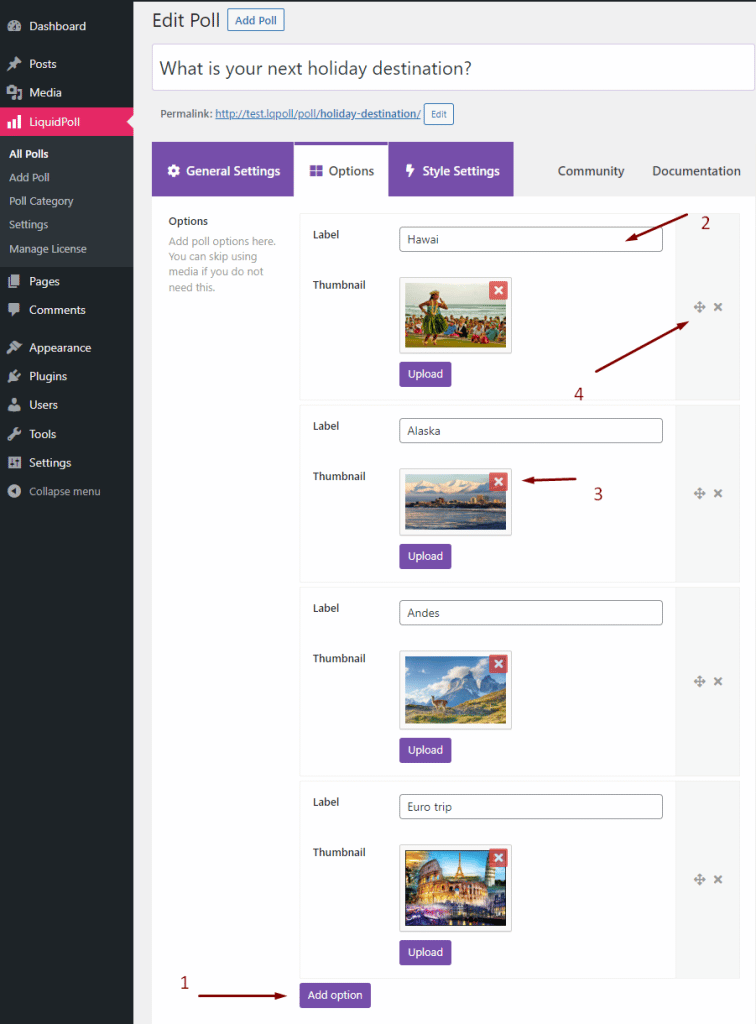
- Add option: Click this button to add an option, a title and an image upload field will generate every time.
- Title: Enter the name of the option.
- Add Image: Adding images to the options create great-looking polls. Try to maintain the same aspect ratio and good enough resolution. If you don’t maintain the aspect ratio, you might end up with options with uneven spacing. You can remove an image by the red cross button at the corner.
- Rearrange or Remove: You can rearrange the order using the arrow key at the right side of each option or delete using the cross button.
Style and Customization #
This is where things become more interesting and where LiquidPoll really shines.
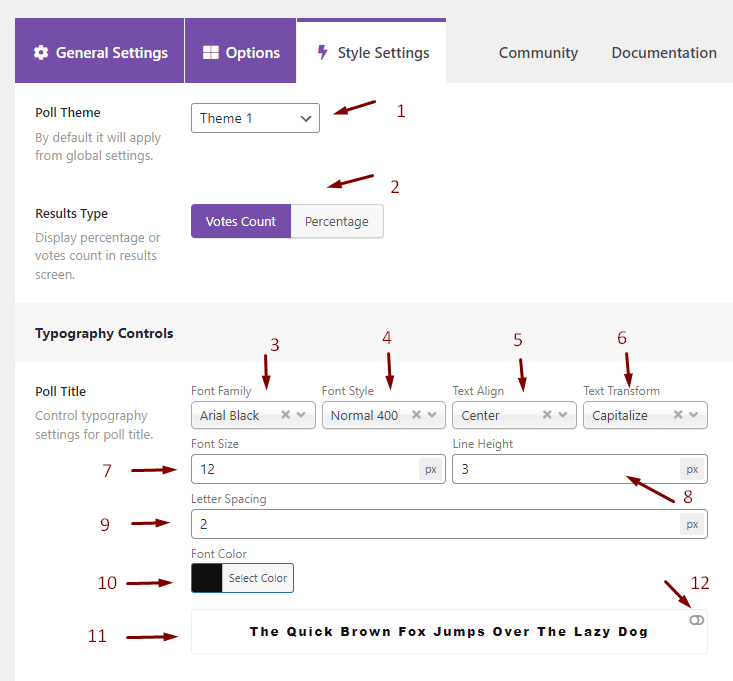
- Theme: Select the theme of your poll. Different themes display the options uniquely. Free has a limit of 3 themes, whereas pro has 10 and more are being added.
- Result: After submitting the answer, the user can check the results. So, either you can show a percentage of the result or the number of votes each option has received.
- Font: We have integrated Google Fonts into LiquidPoll, so enjoy all the fonts and languages that come along with it.
- Style: Select between normal, bold or italic or combination.
- Alignment: Left, Right or Center.
- Transform: Very handy feature. You can easily Capitalize or put all letters in uppercase with this feature.
- Font Size: Determines which size the font will be. While playing with this feature bear in mind that it doesn’t destroy the hierarchy of the texts or become uneven with other texts.
- Line Height: Vertical gap between each line of text. Leave empty to work with the default and optimized gap of the theme selected.
- Spacing: The gap between each letter.
- Color: Choose the font color. HEX codes and transparent support.
- Preview: This panel gives you a live preview of the changes you are making.
- Dark Mode: Check if your text does not get lost if the user’s browser is set to dark mode. Clicking this toggle will give you a dark background to test it out.
- Background color: You can also edit the background on the buttons of each pole using this option. HEX codes and transparent support.
Publishing #
- Once the changes are made, hit publish.
- Copy the shortcode to a page in your desired location.
- View the page and there you have it!
After saving, visit the page and test the survey. After testing, you can easily reset the results from Dashboard > LiquidPoll > All polls > Reset results (look for the small text below your poll)
If you have additional questions, or do you need further assistance please send us a message at [email protected] or start a chat conversation right on this page. We want to keep improving our customer service, but we need your help to do so!