Remember the one time you are visiting online shops before Christmas Eve, and all the sites have ticking clocks! Countdown timers are effective to put customers in a rush and make a purchase. It allows them to check the availability of discounts/ offers, influencing their buying behavior.
With the expiry date in mind, customers are put in a hurry to make a decision. This time, we are going to use countdown timers with Polls! Believe it or not, with LiquidPoll, you can show your audience when the poll is going to close. Hence, encouraging them to participate in the polls sooner!
In this article today, we are going to learn how you can create and attach countdown timers for Polls.
Countdown Timers with LiquidPoll
LiquidPoll is everyone’s favorite because it offers a simple and intuitive user experience. Here, you can attach simple to advanced features within a fraction of the time. One of such major features we are going to talk about today is setting up a Countdown Timer for Polls.
To set up timers for Polls, you have to create a Poll first. Countdown timers are for Polls only. For NPS or Reaction Polls, you have to work without timers for now! Follow these steps with us to set up specified countdown timers.
Setting Up Countdown Timers:
1) To set up a countdown timer, you have to start with creating Polls – as mentioned earlier. Go to LiquidPoll> Add Poll.
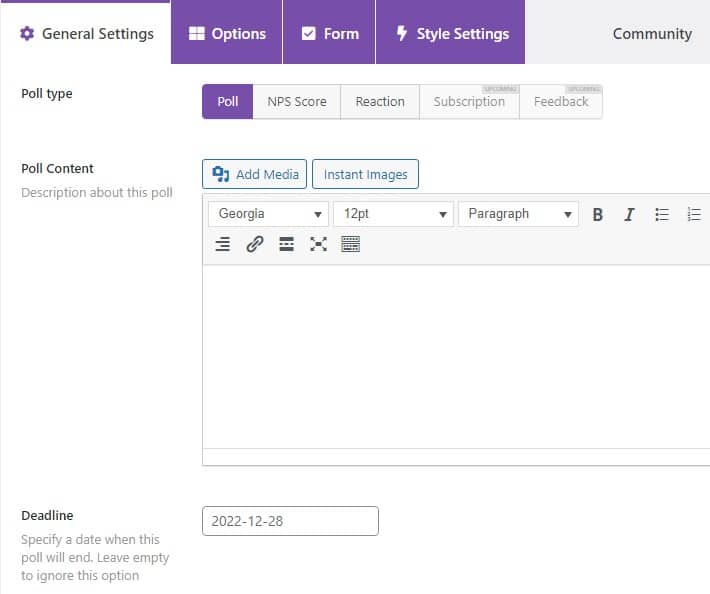
With a viewpoint like this, you have to set up the Poll Title, Type, Content, and other things. Countdown timers have to be set up from the General Settings.
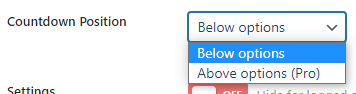
2) After you have set up all the general information, look out for the options “Deadline” and “Countdown Position.”
This is the part where you will set up timers from.
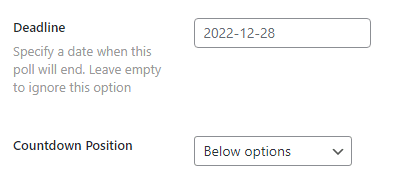
- Deadline: The deadline specifies the date when the poll will end. The time you set here will be fixed under the countdown timer to preview the expiry date. For countdown timers, you must have to set this date. Otherwise, you can leave it open.
- Countdown Position: Using this option, you can fix the countdown timer position. With LiquidPoll, you can set up Polls in two different positions. For LiquidPoll Free, you can fix the position of the countdown timer in only one position – the below options.
For LiquidPoll Pro, you can place the timer above the Poll – the Above options. However, the Countdown timer type also changes with some Poll themes. We will talk about this later in this article.
When you have inserted all the information under General Settings, go to Options, Forms, and Style Settings. Set up these options here and finally publish the Poll. You can learn more about creating Polls with LiquidPoll here.
I have created a simple Poll. You can see the Poll Options here and also the countdown timer (set up to end at the 31st night) as well.

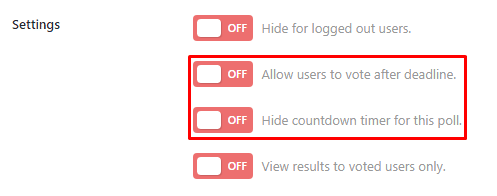
Votes will end at the end of the deadline. This is set by default. However, you can make changes otherwise. You can also set up additional changes like Hiding Countdown Timer for This Poll from the Settings under General Settings.
This was all about Countdown Timers for any Polls. However, some Poll themes in LiquidPoll also allow you to set up the Timer style differently. How? We are getting to that point.
Timer Type for Different Poll Themes:
With LiquidPoll Free, you have one free Poll theme to play with. On the contrary, for LiquidPoll Pro you are getting 10+ Poll themes.
All these Poll themes come with different styling options. For example, you can set the Result Type (whether vote or percentage) – excludes themes 6, 7, 4, 11, and 12. The one we are going to talk about today is the Countdown Timer Type.
Countdown Timer Type contains both – the vote numbers and deadline. This feature comes with Poll themes – 10, 11, and 12; available under Style Settings.
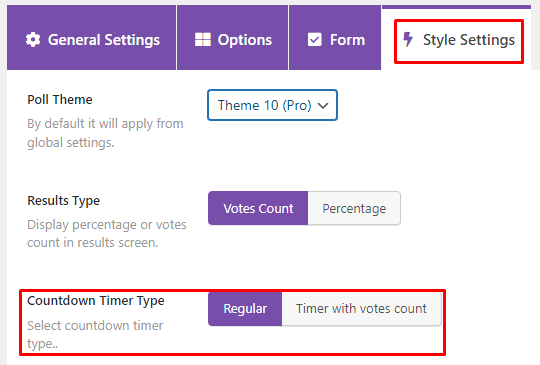
Now for the same Poll, we created above – select Theme 10 from the Style Settings. Make sure you have enabled LiquidPoll Pro for this action.
Select “Timer with votes count” for Countdown Timer Type. Let’s see how the Poll looks like.
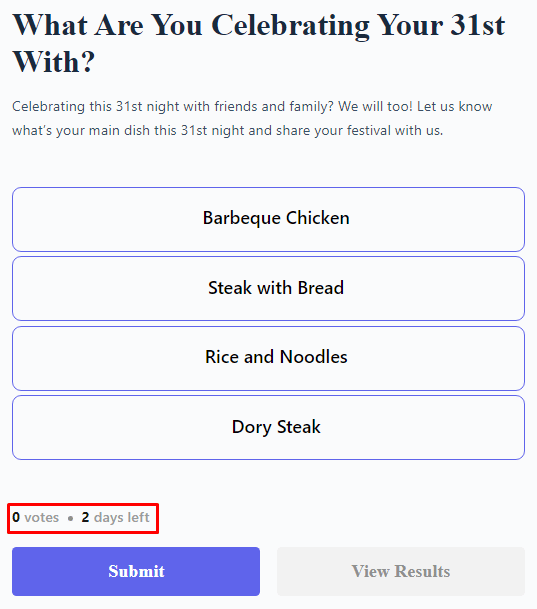
With Theme 10 enabled, our Poll looks like this. After you have set up the timer type to Timer with the vote count, you can see a small section where vote counts are visible with the estimated deadline in days.
That’s how you can set up Timer Type with different Poll themes. In our next section, we will talk about Countdown Timer in Elementor Widget.
Countdown Timer in Elementor Widget:
Those of you who have updated LiquidPoll to its latest version (both free and pro) already know about LiquidPoll – Elementor Widget. You can now enjoy all the flexibilities of Elementor and manage your Polls/ NPS/ Reaction Polls.
All features included: you can set up the countdown timer from this widget and set up the timer type with LiquidPoll Pro.
1) Go to Pages> All Pages> Edit with Elementor. Type LiquidPoll Widget in the search menu and from here you can select and drop any Poll to your page.
2) Go to Style. Under Global Style, you will find different options including – Poll Theme and Countdown Timer Type. Since timer type is available from Poll themes 10-12, you can select countdown timer type for these three Poll themes. Select from the dropdown menu as shown in this video and find the difference yourself.
Final Words:
LiqiudPoll is designed to offer a fun poll-generating experience for WP users! The team has come up with advanced features like Custom CSS, enhancing Poll background to design the Polls to user preference. And this progress to improve your experience with LiquidPoll won’t stop!
Countdown timers make your Polls more interesting and intriguing to engage. This simple process can increase the number of Poll attendees to a lot extent! Follow these simple steps with us and enhance your Poll experience for your target audience. Thank us later!
To learn further about LiquidPoll, please contact us here.